Améliorer la classification de caractéristiques à l'aide de noyaux quantiques projetés
Estimation d'utilisation : 80 minutes sur un processeur Heron r3 (REMARQUE : Ceci est une estimation uniquement. Ton temps d'exécution peut varier.)
Résultats d'apprentissage
Après avoir suivi ce tutoriel, les utilisateurs devraient comprendre :
- Comment les noyaux quantiques projetés (PQK) fonctionnent et dans quels cas ils offrent un avantage quantique potentiel.
- Comment exécuter un PQK sur du matériel en utilisant un jeu de données réel.
Prérequis
Nous suggérons aux utilisateurs d'être familiers avec les sujets suivants avant de suivre ce tutoriel :
- Les noyaux quantiques du cours d'apprentissage automatique quantique dans IBM Quantum® Learning
Contexte
Dans ce tutoriel, nous montrons comment exécuter un noyau quantique projeté (PQK) avec Qiskit sur un jeu de données biologiques réel, en nous basant sur l'article Enhanced Prediction of CAR T-Cell Cytotoxicity with Quantum-Kernel Methods [1].
Le PQK est une méthode utilisée en apprentissage automatique quantique (QML) pour encoder des données classiques dans un espace de caractéristiques quantique et les projeter à nouveau dans le domaine classique, en utilisant des ordinateurs quantiques pour améliorer la sélection de caractéristiques. Cela implique l'encodage de données classiques dans des états quantiques à l'aide d'un circuit quantique, généralement par un processus appelé mappage de caractéristiques (feature mapping), où les données sont transformées dans un espace de Hilbert de haute dimension. L'aspect « projeté » fait référence à l'extraction d'informations classiques à partir des états quantiques, en mesurant des observables spécifiques, afin de construire une matrice de noyau qui peut être utilisée dans des algorithmes classiques basés sur les noyaux, comme les machines à vecteurs de support. Cette approche exploite les avantages computationnels des systèmes quantiques pour potentiellement obtenir de meilleures performances sur certaines tâches par rapport aux méthodes classiques.
Les principaux éléments constitutifs des PQK sont les matrices densité réduites (RDM), obtenues par des mesures projectives de la carte de caractéristiques quantique. En particulier, on calcule généralement les matrices densité réduites à un seul qubit (1-RDM) pour chaque qubit. Ces quantités mesurées sont ensuite utilisées comme entrées d'une fonction de noyau classique, comme un noyau exponentiel, pour construire la matrice de noyau finale.
Les PQK offrent des avantages potentiels par rapport aux noyaux quantiques standard, en particulier pour le matériel quantique à court terme. Les noyaux quantiques standard reposent généralement sur l'estimation de recouvrements d'états globaux, qui deviennent de plus en plus difficiles à mesurer précisément à mesure que le nombre de qubits augmente et sont très sensibles au bruit. En revanche, les PQK utilisent des observables locaux tels que les matrices densité réduites à un seul qubit (1-RDM), ce qui entraîne une réduction des frais d'échantillonnage, une meilleure robustesse au bruit matériel et une meilleure évolutivité. En projetant les états quantiques sur des caractéristiques de mesure locales avant d'appliquer une fonction de noyau classique, les PQK peuvent conserver des corrélations quantiques utiles tout en restant plus pratiques pour les dispositifs à court terme.
Exigences
Avant de commencer ce tutoriel, assure-toi que les éléments suivants sont installés :
- Qiskit SDK v2.0 ou ultérieur, avec le support de visualisation
- Qiskit Runtime v0.40 ou ultérieur (
pip install qiskit-ibm-runtime) - Category encoders 2.8.1 (
pip install category-encoders) - NumPy 2.3.2 (
pip install numpy) - Pandas 2.3.2 (
pip install pandas) - Scikit-learn 1.7.1 (
pip install scikit-learn) - Tqdm 4.67.1 (
pip install tqdm)
Configuration
# Added by doQumentation — required packages for this notebook
!pip install -q category-encoders numpy pandas qiskit qiskit-ibm-runtime scipy scikit-learn tqdm
import warnings

# Standard libraries
import os
import numpy as np
import pandas as pd

# Machine learning and data processing
import category_encoders as ce
from scipy.linalg import inv, sqrtm
from sklearn.metrics.pairwise import rbf_kernel
from sklearn.model_selection import GridSearchCV, StratifiedKFold
from sklearn.svm import SVC

# Qiskit and Qiskit Runtime
from qiskit import QuantumCircuit
from qiskit.circuit import ParameterVector
from qiskit.circuit.library import UnitaryGate, ZZFeatureMap
from qiskit.quantum_info import SparsePauliOp, random_unitary
from qiskit.transpiler import generate_preset_pass_manager
from qiskit_ibm_runtime import (
    Batch,
    EstimatorOptions,
    EstimatorV2 as Estimator,
    QiskitRuntimeService,
)

# Progress bar
import tqdm

warnings.filterwarnings("ignore")
Exemple de simulateur à petite échelle
Nous omettons l'exemple de simulateur à petite échelle dans ce tutoriel, notre objectif principal étant de démontrer comment les noyaux quantiques projetés peuvent passer à des systèmes plus grands et à du matériel réel.
Exemple de matériel à grande échelle
Étape 1 : Mapper les entrées classiques vers un problème quantique
Préparation du jeu de données
Dans ce tutoriel, nous utilisons un jeu de données biologiques réel pour une tâche de classification binaire, généré par Daniels et al. (2022) et téléchargeable depuis le matériel supplémentaire inclus avec l'article. Les données sont constituées de cellules CAR T, qui sont des cellules T génétiquement modifiées utilisées en immunothérapie pour traiter certains cancers. Les cellules T, un type de cellule immunitaire, sont modifiées en laboratoire pour exprimer des récepteurs antigéniques chimériques (CAR) ciblant des protéines spécifiques sur les cellules cancéreuses. Ces cellules T modifiées peuvent reconnaître et détruire les cellules cancéreuses plus efficacement. Les caractéristiques des données sont les motifs des cellules CAR T, qui font référence au composant structurel ou fonctionnel spécifique du CAR intégré dans les cellules T. Sur la base de ces motifs, notre tâche consiste à prédire la cytotoxicité d'une cellule CAR T donnée, en la classifiant comme toxique ou non toxique. Ci-dessous se trouvent les fonctions utilitaires pour le prétraitement de ce jeu de données.
def preprocess_data(dir_root, args):
    """
    Preprocess the training and test data.
    """
    # Read from the csv files
    train_data = pd.read_csv(
        os.path.join(dir_root, args["file_train_data"]),
        encoding="unicode_escape",
        sep=",",
    )
    test_data = pd.read_csv(
        os.path.join(dir_root, args["file_test_data"]),
        encoding="unicode_escape",
        sep=",",
    )

    # Fix the last motif ID
    train_data[train_data == 17] = 14
    train_data.columns = [
        "Cell Number",
        "motif",
        "motif.1",
        "motif.2",
        "motif.3",
        "motif.4",
        "Nalm 6 Cytotoxicity",
    ]
    test_data[test_data == 17] = 14
    test_data.columns = [
        "Cell Number",
        "motif",
        "motif.1",
        "motif.2",
        "motif.3",
        "motif.4",
        "Nalm 6 Cytotoxicity",
    ]

    # Adjust motif at the third position
    if args["filter_for_spacer_motif_third_position"]:
        train_data = train_data[
            (train_data["motif.2"] == 14) | (train_data["motif.2"] == 0)
        ]
        test_data = test_data[
            (test_data["motif.2"] == 14) | (test_data["motif.2"] == 0)
        ]

    train_data = train_data[
        args["motifs_to_use"] + [args["label_name"], "Cell Number"]
    ]
    test_data = test_data[
        args["motifs_to_use"] + [args["label_name"], "Cell Number"]
    ]

    # Adjust motif at the last position
    if not args["allow_spacer_motif_last_position"]:
        last_motif = args["motifs_to_use"][len(args["motifs_to_use"]) - 1]
        train_data = train_data[
            (train_data[last_motif] != 14) & (train_data[last_motif] != 0)
        ]
        test_data = test_data[
            (test_data[last_motif] != 14) & (test_data[last_motif] != 0)
        ]

    # Get the labels
    train_labels = np.array(train_data[args["label_name"]])
    test_labels = np.array(test_data[args["label_name"]])

    # For the classification task use the threshold to binarize labels
    train_labels[train_labels > args["label_binarization_threshold"]] = 1
    train_labels[train_labels < 1] = args["min_label_value"]
    test_labels[test_labels > args["label_binarization_threshold"]] = 1
    test_labels[test_labels < 1] = args["min_label_value"]

    # Reduce data to just the motifs of interest
    train_data = train_data[args["motifs_to_use"]]
    test_data = test_data[args["motifs_to_use"]]

    # Get the class and motif counts
    min_class = np.min(np.unique(np.concatenate([train_data, test_data])))
    max_class = np.max(np.unique(np.concatenate([train_data, test_data])))

    num_class = max_class - min_class + 1
    num_motifs = len(args["motifs_to_use"])
    print(str(max_class) + ":" + str(min_class) + ":" + str(num_class))

    train_data = train_data - min_class
    test_data = test_data - min_class

    return (
        train_data,
        test_data,
        train_labels,
        test_labels,
        num_class,
        num_motifs,
    )

def data_encoder(args, train_data, test_data, num_class, num_motifs):
    """
    Use one-hot or binary encoding for classical data representation.
    """
    if args["encoder"] == "one-hot":
        # Transform to one-hot encoding
        train_data = np.eye(num_class)[train_data]
        test_data = np.eye(num_class)[test_data]

        train_data = train_data.reshape(
            train_data.shape[0], train_data.shape[1] * train_data.shape[2]
        )
        test_data = test_data.reshape(
            test_data.shape[0], test_data.shape[1] * test_data.shape[2]
        )

    elif args["encoder"] == "binary":
        # Transform to binary encoding
        encoder = ce.BinaryEncoder()

        base_array = np.unique(np.concatenate([train_data, test_data]))
        base = pd.DataFrame(base_array).astype("category")
        base.columns = ["motif"]
        for motif_name in args["motifs_to_use"][1:]:
            base[motif_name] = base.loc[:, "motif"]
        encoder.fit(base)

        train_data = encoder.transform(train_data.astype("category"))
        test_data = encoder.transform(test_data.astype("category"))

        train_data = np.reshape(
            train_data.values, (train_data.shape[0], num_motifs, -1)
        )
        test_data = np.reshape(
            test_data.values, (test_data.shape[0], num_motifs, -1)
        )

        train_data = train_data.reshape(
            train_data.shape[0], train_data.shape[1] * train_data.shape[2]
        )
        test_data = test_data.reshape(
            test_data.shape[0], test_data.shape[1] * test_data.shape[2]
        )

    else:
        raise ValueError("Invalid encoding type.")

    return train_data, test_data
Tu peux exécuter ce tutoriel en lançant la cellule suivante, qui crée automatiquement la structure de dossiers requise et télécharge les fichiers d'entraînement et de test directement dans ton environnement. Si tu disposes déjà de ces fichiers localement, cette étape les écrasera en toute sécurité pour garantir la cohérence des versions.
## Download dataset

# Create data directory if it doesn't exist
!mkdir -p data_tutorial/pqk

# Download the training and test sets from the official Qiskit documentation repo
!wget -q --show-progress -O data_tutorial/pqk/train_data.csv \
  https://raw.githubusercontent.com/Qiskit/documentation/main/datasets/tutorials/pqk/train_data.csv

!wget -q --show-progress -O data_tutorial/pqk/test_data.csv \
  https://raw.githubusercontent.com/Qiskit/documentation/main/datasets/tutorials/pqk/test_data.csv

!wget -q --show-progress -O data_tutorial/pqk/projections_train.csv \
  https://raw.githubusercontent.com/Qiskit/documentation/main/datasets/tutorials/pqk/projections_train.csv

!wget -q --show-progress -O data_tutorial/pqk/projections_test.csv \
  https://raw.githubusercontent.com/Qiskit/documentation/main/datasets/tutorials/pqk/projections_test.csv

# Check the files have been downloaded
!echo "Dataset files downloaded:"
!ls -lh data_tutorial/pqk/*.csv
args = {
    "file_train_data": "train_data.csv",
    "file_test_data": "test_data.csv",
    "motifs_to_use": ["motif", "motif.1", "motif.2", "motif.3"],
    "label_name": "Nalm 6 Cytotoxicity",
    "label_binarization_threshold": 0.62,
    "filter_for_spacer_motif_third_position": False,
    "allow_spacer_motif_last_position": True,
    "min_label_value": -1,
    "encoder": "one-hot",
}
dir_root = "./"

# Preprocess data
train_data, test_data, train_labels, test_labels, num_class, num_motifs = (
    preprocess_data(dir_root=dir_root, args=args)
)

# Encode the data
train_data, test_data = data_encoder(
    args, train_data, test_data, num_class, num_motifs
)
14:0:15
Nous transformons également le jeu de données de sorte que soit représenté par à des fins de mise à l'échelle.
# Change 1 to pi/2
angle = np.pi / 2

tmp = pd.DataFrame(train_data).astype("float64")
tmp[tmp == 1] = angle
train_data = tmp.values

tmp = pd.DataFrame(test_data).astype("float64")
tmp[tmp == 1] = angle
test_data = tmp.values
Nous vérifions les tailles et les dimensions des jeux de données d'entraînement et de test.
print(train_data.shape, train_labels.shape)
print(test_data.shape, test_labels.shape)
(172, 60) (172,)
(74, 60) (74,)
Étape 2 : Optimiser le problème pour l'exécution sur du matériel quantique
Circuit quantique
Nous construisons maintenant le mappage de caractéristiques (feature map) qui intègre notre jeu de données classique dans un espace de caractéristiques de dimension supérieure. Pour cette intégration, nous utilisons le ZZFeatureMap de Qiskit.
feature_dimension = train_data.shape[1]
reps = 24
insert_barriers = True
entanglement = "pairwise"

# ZZFeatureMap with linear entanglement and a repetition of 2
embed = ZZFeatureMap(
    feature_dimension=feature_dimension,
    reps=reps,
    entanglement=entanglement,
    insert_barriers=insert_barriers,
    name="ZZFeatureMap",
)
embed.decompose().draw(output="mpl", style="iqp", fold=-1)

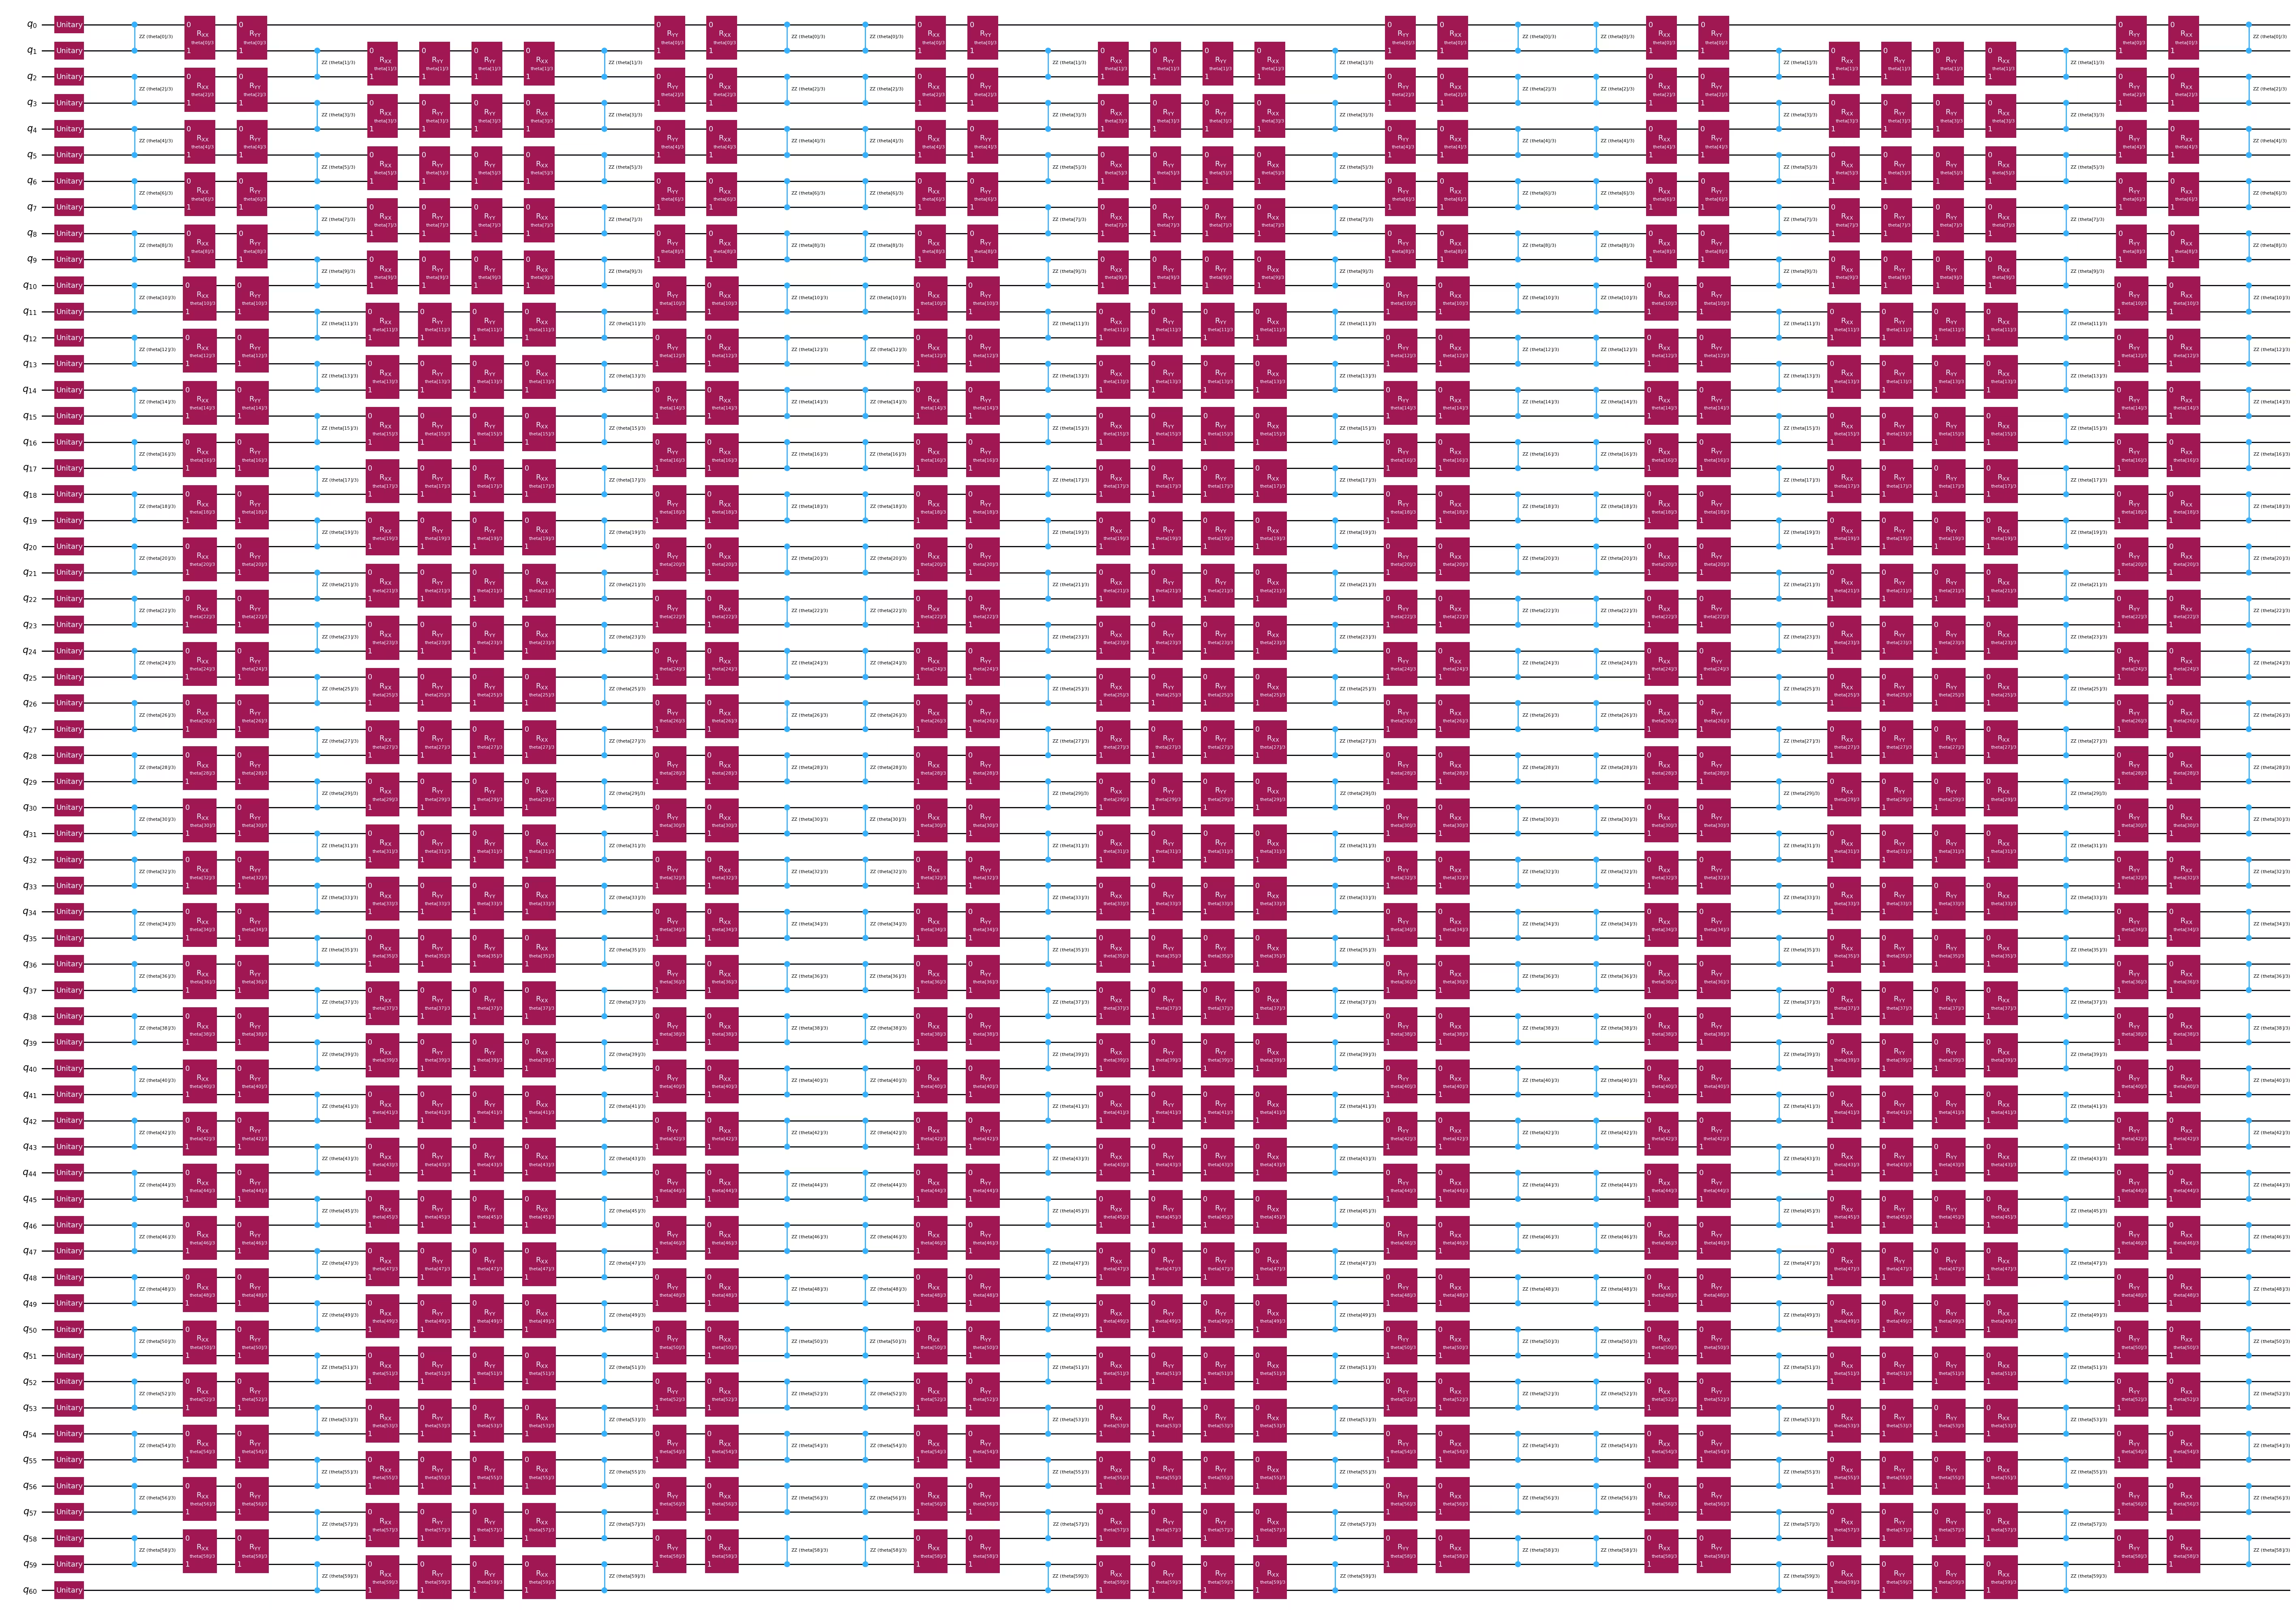
Une autre option d'intégration quantique est l'ansatz d'évolution hamiltonienne de Heisenberg 1D. Tu peux ignorer l'exécution de cette section si tu souhaites continuer avec le ZZFeatureMap.
feature_dimension = train_data.shape[1]
num_qubits = feature_dimension + 1
embed2 = QuantumCircuit(num_qubits)
num_trotter_steps = 6
pv_length = feature_dimension * num_trotter_steps
pv = ParameterVector("theta", pv_length)

# Add Haar random single qubit unitary to each qubit as initial state
np.random.seed(42)
seeds_unitary = np.random.randint(0, 100, num_qubits)
for i in range(num_qubits):
    rand_gate = UnitaryGate(random_unitary(2, seed=seeds_unitary[i]))
    embed2.append(rand_gate, [i])

def trotter_circ(feature_dimension, num_trotter_steps):
    num_qubits = feature_dimension + 1
    circ = QuantumCircuit(num_qubits)
    # Even
    for i in range(0, feature_dimension, 2):
        circ.rzz(2 * pv[i] / num_trotter_steps, i, i + 1)
    for i in range(0, feature_dimension, 2):
        circ.rxx(2 * pv[i] / num_trotter_steps, i, i + 1)
    for i in range(0, feature_dimension, 2):
        circ.ryy(2 * pv[i] / num_trotter_steps, i, i + 1)
    # Odd
    for i in range(1, feature_dimension, 2):
        circ.rzz(2 * pv[i] / num_trotter_steps, i, i + 1)
    for i in range(1, feature_dimension, 2):
        circ.rxx(2 * pv[i] / num_trotter_steps, i, i + 1)
    for i in range(1, feature_dimension, 2):
        circ.ryy(2 * pv[i] / num_trotter_steps, i, i + 1)
    return circ

# Hamiltonian evolution ansatz
for step in range(num_trotter_steps):
    circ = trotter_circ(feature_dimension, num_trotter_steps)
    if step % 2 == 0:
        embed2 = embed2.compose(circ)
    else:
        reverse_circ = circ.reverse_ops()
        embed2 = embed2.compose(reverse_circ)

embed2.draw(output="mpl", style="iqp", fold=-1)
Étape 3 : Exécution à l'aide des primitives Qiskit
Mesure des 1-RDM
Dans cette étape, nous obtenons toutes les matrices densité réduites à un seul qubit (1-RDM) par des mesures projectives de la carte de caractéristiques quantique, qui seront ensuite fournies à la fonction de noyau exponentiel classique.
Voyons comment calculer la 1-RDM pour un seul point de données de l'ensemble de données avant de parcourir toutes les données. Les 1-RDM sont une collection de mesures à un seul qubit des opérateurs de Pauli X, Y et Z sur tous les qubits. Cela s'explique par le fait qu'une RDM à un seul qubit peut être entièrement exprimée comme :
Nous sélectionnons d'abord le backend à utiliser.
service = QiskitRuntimeService()
backend = service.least_busy(
    operational=True, simulator=False, min_num_qubits=133
)
target = backend.target
Ensuite, nous exécutons le circuit quantique et mesurons les projections. Note que nous activons l'atténuation des erreurs, y compris l'extrapolation à bruit nul (ZNE).
# Let's select the ZZFeatureMap embedding for this example
qc = embed
num_qubits = feature_dimension

# Identity operator on all qubits
id = "I" * num_qubits

# Let's select the first training datapoint as an example
parameters = train_data[0]

# Bind parameter to the circuit and simplify it
qc_bound = qc.assign_parameters(parameters)
transpiler = generate_preset_pass_manager(
    optimization_level=3, basis_gates=["u3", "cz"]
)
transpiled_circuit = transpiler.run(qc_bound)

# Transpile for hardware
transpiler = generate_preset_pass_manager(optimization_level=3, target=target)
transpiled_circuit = transpiler.run(transpiled_circuit)

# We group all commuting observables
# These groups are the Pauli X, Y and Z operators on individual qubits
observables_x = [
    SparsePauliOp(id[:i] + "X" + id[(i + 1) :]).apply_layout(
        transpiled_circuit.layout
    )
    for i in range(num_qubits)
]
observables_y = [
    SparsePauliOp(id[:i] + "Y" + id[(i + 1) :]).apply_layout(
        transpiled_circuit.layout
    )
    for i in range(num_qubits)
]
observables_z = [
    SparsePauliOp(id[:i] + "Z" + id[(i + 1) :]).apply_layout(
        transpiled_circuit.layout
    )
    for i in range(num_qubits)
]

# We define the primitive unified blocs (PUBs) consisting of the embedding circuit,
# set of observables and the circuit parameters
pub_x = (transpiled_circuit, observables_x)
pub_y = (transpiled_circuit, observables_y)
pub_z = (transpiled_circuit, observables_z)

# Experiment options for error mitigation
num_randomizations = 300
shots_per_randomization = 100
noise_factors = [1, 3, 5]

experimental_opts = {}
experimental_opts["resilience"] = {
    "measure_mitigation": True,
    "zne_mitigation": True,
    "zne": {
        "noise_factors": noise_factors,
        "amplifier": "gate_folding",
        "extrapolated_noise_factors": [0] + noise_factors,
    },
}
experimental_opts["twirling"] = {
    "num_randomizations": num_randomizations,
    "shots_per_randomization": shots_per_randomization,
    "strategy": "active-accum",
}

# We define and run the estimator to obtain <X>, <Y> and <Z> on all qubits
estimator = Estimator(mode=backend, options=experimental_opts)

job = estimator.run([pub_x, pub_y, pub_z])
Ensuite, nous récupérons les résultats.
job_result_x = job.result()[0].data.evs
job_result_y = job.result()[1].data.evs
job_result_z = job.result()[2].data.evs
print(job_result_x)
print(job_result_y)
print(job_result_z)
[ 3.67865951e-03  1.01158571e-02 -3.95790878e-02  6.33984326e-03
  1.86035759e-02 -2.91533268e-02 -1.06374793e-01  4.48873518e-18
  4.70201764e-02  3.53997968e-02  2.53130819e-02  3.23903401e-02
  6.06327843e-03  1.16313667e-02 -1.12387504e-02 -3.18457725e-02
 -4.16445718e-04 -1.45609602e-03 -4.21737114e-01  2.83705669e-02
  6.91332890e-03 -7.45363001e-02 -1.20139326e-02 -8.85566135e-02
 -3.22648394e-02 -3.24228074e-02  6.20431299e-04  3.04225434e-03
  5.72795792e-03  1.11288428e-02  1.50395861e-01  9.18380197e-02
  1.02553163e-01  2.98312847e-02 -3.30298912e-01 -1.13979648e-01
  4.49159340e-03  8.63861493e-02  3.05666566e-02  2.21463145e-04
  1.45946735e-02  8.54537275e-03 -8.09805979e-02 -2.92608104e-02
 -3.91243644e-02 -3.96632760e-02 -1.41187613e-01 -1.07363243e-01
  1.81089440e-02  2.70778895e-02  1.45139414e-02  2.99480458e-02
  4.99137134e-02  7.08789852e-02  4.30565759e-02  8.71287156e-02
  1.04334798e-01  7.72191962e-02  7.10059720e-02  1.04650403e-01]
[-7.31765102e-05  7.42669174e-03  9.82277344e-03  5.92638249e-02
  4.24120486e-02 -9.06473416e-03  4.55057675e-03  8.43494094e-03
  6.92097339e-02 -6.82234424e-02  6.13509008e-02  3.94200491e-02
 -1.24037979e-02  1.01976642e-01  7.90538600e-03 -7.19726160e-02
 -1.19501703e-16 -1.03796614e-02  7.37382463e-02  1.97238568e-01
 -3.59250635e-02 -2.67554009e-02  3.55010633e-02  7.68877990e-02
  6.50677589e-05 -6.59298767e-03 -1.23719487e-02 -6.41938151e-02
  1.95603072e-02 -2.48448551e-02  5.17784810e-02 -5.93767100e-02
  3.11897681e-02 -3.91959720e-18 -4.47769148e-03  1.39202197e-01
 -6.56387523e-02 -5.85665483e-02  9.52905894e-03 -8.61460731e-02
  3.91790656e-02 -1.27544375e-01  1.63712244e-01  3.36816934e-04
  2.26230028e-02 -2.45023393e-05  4.95635588e-03  1.44779564e-01
  3.71625177e-02  3.65675948e-03  2.83694017e-02 -7.10500602e-02
 -1.15467702e-01  6.21712129e-03 -4.80958959e-02  2.21021066e-02
  7.99062499e-02 -1.87164076e-02 -3.67100369e-02 -2.38923731e-02]
[ 6.85871605e-01  5.07725024e-01  8.71024642e-03  3.34823455e-02
  4.58684961e-02  9.44384189e-17 -4.46829296e-02 -2.91296778e-02
  4.15466461e-02  2.89628330e-02  1.88624017e-03  5.37110446e-02
  2.59579053e-03  1.39327071e-02 -2.90781778e-02  5.07209866e-03
  5.83403000e-02  2.60764440e-02  4.45999706e-17 -6.66701417e-03
  3.03215873e-01  2.26172533e-02  2.43105960e-02  4.98861041e-18
 -2.45530791e-02  6.26940708e-02  1.21058073e-02  2.76675948e-04
  2.63980996e-02  2.58302364e-02  7.47856723e-02  8.42728943e-02
  5.70989097e-02  6.92955086e-02 -5.68313712e-03  1.32199452e-01
  8.90511238e-02 -3.45204621e-02 -1.05445836e-01  6.03864150e-03
  2.16291384e-02  8.22303162e-03  1.00856715e-02  6.28973151e-02
  6.26727169e-02  6.15399206e-02  9.67320897e-02  1.03045269e-16
  1.79688783e-01 -1.59960520e-02 -1.15422952e-02  9.60200470e-03
  6.58396672e-02  7.78329830e-03  6.53226955e-02  2.45778685e-03
  4.36694753e-03  5.75098762e-03 -2.48896201e-02  8.33740755e-05]
Nous affichons la taille du circuit et la profondeur en portes à deux qubits.
print(f"qubits: {qc.num_qubits}")
print(
    f"2q-depth: {transpiled_circuit.depth(lambda x: x.operation.num_qubits==2)}"
)
print(
    f"2q-size: {transpiled_circuit.size(lambda x: x.operation.num_qubits==2)}"
)
print(f"Operator counts: {transpiled_circuit.count_ops()}")
transpiled_circuit.draw("mpl", fold=-1, style="clifford", idle_wires=False)
qubits: 60
2q-depth: 64
2q-size: 1888
Operator counts: OrderedDict({'rz': 6016, 'sx': 4576, 'cz': 1888, 'x': 896, 'barrier': 31})

Nous pouvons maintenant parcourir l'ensemble de données d'entraînement complet pour obtenir toutes les 1-RDM.
Nous fournissons également les résultats d'une expérience que nous avons exécutée sur du matériel quantique. Tu peux soit exécuter l'entraînement toi-même en définissant l'indicateur ci-dessous sur True, soit utiliser les résultats de projection que nous fournissons.
# Set this to True if you want to run the training on hardware
run_experiment = False
# Identity operator on all qubits
id = "I" * num_qubits

# projections_train[i][j][k] will be the expectation value of the j-th
# Pauli operator (0: X, 1: Y, 2: Z) of datapoint i on qubit k
projections_train = []
jobs_train = []

# Experiment options for error mitigation
num_randomizations = 300
shots_per_randomization = 100
noise_factors = [1, 3, 5]

experimental_opts = {}
experimental_opts["resilience"] = {
    "measure_mitigation": True,
    "zne_mitigation": True,
    "zne": {
        "noise_factors": noise_factors,
        "amplifier": "gate_folding",
        "return_all_extrapolated": True,
        "return_unextrapolated": True,
        "extrapolated_noise_factors": [0] + noise_factors,
    },
}
experimental_opts["twirling"] = {
    "num_randomizations": num_randomizations,
    "shots_per_randomization": shots_per_randomization,
    "strategy": "active-accum",
}
options = EstimatorOptions(experimental=experimental_opts)

if run_experiment:
    with Batch(backend=backend):
        for i in tqdm.tqdm(
            range(len(train_data)), desc="Training data progress"
        ):
            # Get training sample
            parameters = train_data[i]

            # Bind parameter to the circuit and simplify it
            qc_bound = qc.assign_parameters(parameters)
            transpiler = generate_preset_pass_manager(
                optimization_level=3, basis_gates=["u3", "cz"]
            )
            transpiled_circuit = transpiler.run(qc_bound)

            # Transpile for hardware
            transpiler = generate_preset_pass_manager(
                optimization_level=3, target=target
            )
            transpiled_circuit = transpiler.run(transpiled_circuit)

            # We group all commuting observables
            # These groups are the Pauli X, Y and Z operators on individual qubits
            observables_x = [
                SparsePauliOp(id[:i] + "X" + id[(i + 1) :]).apply_layout(
                    transpiled_circuit.layout
                )
                for i in range(num_qubits)
            ]
            observables_y = [
                SparsePauliOp(id[:i] + "Y" + id[(i + 1) :]).apply_layout(
                    transpiled_circuit.layout
                )
                for i in range(num_qubits)
            ]
            observables_z = [
                SparsePauliOp(id[:i] + "Z" + id[(i + 1) :]).apply_layout(
                    transpiled_circuit.layout
                )
                for i in range(num_qubits)
            ]

            # We define the primitive unified blocs (PUBs) consisting
            # of the embedding circuit,
            # set of observables and the circuit parameters
            pub_x = (transpiled_circuit, observables_x)
            pub_y = (transpiled_circuit, observables_y)
            pub_z = (transpiled_circuit, observables_z)

            # We define and run the estimator to obtain <X>, <Y> and <Z>
            # on all qubits
            estimator = Estimator(options=options)

            job = estimator.run([pub_x, pub_y, pub_z])
            jobs_train.append(job)
Training data progress: 100%|██████████| 172/172 [13:03<00:00, 4.55s/it]
Une fois les tâches terminées, nous pouvons récupérer les résultats.
if run_experiment:
    for i in tqdm.tqdm(
        range(len(train_data)), desc="Retrieving training data results"
    ):
        # Completed job
        job = jobs_train[i]

        # Job results
        job_result_x = job.result()[0].data.evs
        job_result_y = job.result()[1].data.evs
        job_result_z = job.result()[2].data.evs

        # Record <X>, <Y> and <Z> on all qubits for the current datapoint
        projections_train.append([job_result_x, job_result_y, job_result_z])
Nous répétons cette opération pour l'ensemble de test.
# Identity operator on all qubits
id = "I" * num_qubits

# projections_test[i][j][k] will be the expectation value of the
# j-th Pauli operator (0: X, 1: Y, 2: Z) of datapoint i on qubit k
projections_test = []
jobs_test = []

# Experiment options for error mitigation
num_randomizations = 300
shots_per_randomization = 100
noise_factors = [1, 3, 5]

experimental_opts = {}
experimental_opts["resilience"] = {
    "measure_mitigation": True,
    "zne_mitigation": True,
    "zne": {
        "noise_factors": noise_factors,
        "amplifier": "gate_folding",
        "return_all_extrapolated": True,
        "return_unextrapolated": True,
        "extrapolated_noise_factors": [0] + noise_factors,
    },
}
experimental_opts["twirling"] = {
    "num_randomizations": num_randomizations,
    "shots_per_randomization": shots_per_randomization,
    "strategy": "active-accum",
}
options = EstimatorOptions(experimental=experimental_opts)

if run_experiment:
    with Batch(backend=backend):
        for i in tqdm.tqdm(range(len(test_data)), desc="Test data progress"):
            # Get test sample
            parameters = test_data[i]

            # Bind parameter to the circuit and simplify it
            qc_bound = qc.assign_parameters(parameters)
            transpiler = generate_preset_pass_manager(
                optimization_level=3, basis_gates=["u3", "cz"]
            )
            transpiled_circuit = transpiler.run(qc_bound)

            # Transpile for hardware
            transpiler = generate_preset_pass_manager(
                optimization_level=3, target=target
            )
            transpiled_circuit = transpiler.run(transpiled_circuit)

            # We group all commuting observables
            # These groups are the Pauli X, Y and Z operators on individual qubits
            observables_x = [
                SparsePauliOp(id[:i] + "X" + id[(i + 1) :]).apply_layout(
                    transpiled_circuit.layout
                )
                for i in range(num_qubits)
            ]
            observables_y = [
                SparsePauliOp(id[:i] + "Y" + id[(i + 1) :]).apply_layout(
                    transpiled_circuit.layout
                )
                for i in range(num_qubits)
            ]
            observables_z = [
                SparsePauliOp(id[:i] + "Z" + id[(i + 1) :]).apply_layout(
                    transpiled_circuit.layout
                )
                for i in range(num_qubits)
            ]

            # We define the primitive unified blocs (PUBs) consisting of
            # the embedding circuit,
            # set of observables and the circuit parameters
            pub_x = (transpiled_circuit, observables_x)
            pub_y = (transpiled_circuit, observables_y)
            pub_z = (transpiled_circuit, observables_z)

            # We define and run the estimator to obtain <X>, <Y> and <Z> on all qubits
            estimator = Estimator(options=options)

            job = estimator.run([pub_x, pub_y, pub_z])
            jobs_test.append(job)
Test data progress: 100%|██████████| 74/74 [00:13<00:00, 5.56it/s]
Nous pouvons récupérer les résultats comme précédemment.
if run_experiment:
    for i in tqdm.tqdm(
        range(len(test_data)), desc="Retrieving test data results"
    ):
        # Completed job
        job = jobs_test[i]

        # Job results
        job_result_x = job.result()[0].data.evs
        job_result_y = job.result()[1].data.evs
        job_result_z = job.result()[2].data.evs

        # Record <X>, <Y> and <Z> on all qubits for the current datapoint
        projections_test.append([job_result_x, job_result_y, job_result_z])
Étape 4 : Post-traitement et renvoi du résultat dans le format classique souhaité
Définition du noyau quantique projeté
Le noyau quantique projeté est défini avec la fonction noyau suivante :
Dans l'équation ci-dessus, est un hyperparamètre ajustable. Les sont les entrées de la matrice noyau .
En utilisant la définition des 1-RDM, nous pouvons constater que les termes individuels de la fonction noyau peuvent être évalués comme , où . Ces valeurs d'espérance sont précisément ce que nous avons mesuré ci-dessus.
En utilisant scikit-learn, nous pouvons en fait calculer le noyau encore plus facilement. Cela est dû à la fonction noyau à base radiale ('rbf') disponible directement : . Il nous suffit d'abord de reformater les nouveaux jeux de données d'entraînement et de test projetés en tableaux bidimensionnels.
Note que le traitement de l'ensemble du jeu de données peut prendre environ 80 minutes sur le QPU. Pour garantir que la suite du tutoriel soit facilement exécutable, nous fournissons également des projections issues d'une expérience précédente (qui sont incluses dans les fichiers que tu as téléchargés dans le bloc de code Download dataset). Si tu as effectué l'entraînement toi-même, tu peux poursuivre le tutoriel avec tes propres résultats.
if run_experiment:
    projections_train = np.array(projections_train).reshape(
        len(projections_train), -1
    )
    projections_test = np.array(projections_test).reshape(
        len(projections_test), -1
    )
else:
    projections_train = np.loadtxt("projections_train.txt")
    projections_test = np.loadtxt("projections_test.txt")
Machine à vecteurs de support (SVM)
Nous pouvons maintenant exécuter un SVM classique sur ce noyau précalculé, et utiliser le noyau entre les ensembles de test et d'entraînement pour la prédiction.
# Range of 'C' and 'gamma' values as SVC hyperparameters
C_range = [0.001, 0.005, 0.007]
C_range.extend([x * 0.01 for x in range(1, 11)])
C_range.extend([x * 0.25 for x in range(1, 60)])
C_range.extend(
    [
        20,
        50,
        100,
        200,
        500,
        700,
        1000,
        1100,
        1200,
        1300,
        1400,
        1500,
        1700,
        2000,
    ]
)

gamma_range = ["auto", "scale", 0.001, 0.005, 0.007]
gamma_range.extend([x * 0.01 for x in range(1, 11)])
gamma_range.extend([x * 0.25 for x in range(1, 60)])
gamma_range.extend([20, 50, 100])

param_grid = dict(C=C_range, gamma=gamma_range)

# Support vector classifier
svc = SVC(kernel="rbf")

# Define the cross validation
cv = StratifiedKFold(n_splits=10)

# Grid search for hyperparameter tuning (q: quantum)
grid_search_q = GridSearchCV(
    svc, param_grid, cv=cv, verbose=1, n_jobs=-1, scoring="f1_weighted"
)
grid_search_q.fit(projections_train, train_labels)

# Best model with best parameters
best_svc_q = grid_search_q.best_estimator_
print(
    f"The best parameters are {grid_search_q.best_params_} with a score of {grid_search_q.best_score_:.4f}"
)

# Test accuracy
accuracy_q = best_svc_q.score(projections_test, test_labels)
print(f"Test accuracy with best model: {accuracy_q:.4f}")
Fitting 10 folds for each of 6622 candidates, totalling 66220 fits
The best parameters are {'C': 8.5, 'gamma': 0.01} with a score of 0.6980
Test accuracy with best model: 0.8108
Comparaison classique
Nous pouvons exécuter un SVM classique avec la fonction noyau à base radiale sans effectuer de projection quantique. Ce résultat constitue notre référence classique.
# Support vector classifier
svc = SVC(kernel="rbf")

# Grid search for hyperparameter tuning (c: classical)
grid_search_c = GridSearchCV(
    svc, param_grid, cv=cv, verbose=1, n_jobs=-1, scoring="f1_weighted"
)
grid_search_c.fit(train_data, train_labels)

# Best model with best parameters
best_svc_c = grid_search_c.best_estimator_
print(
    f"The best parameters are {grid_search_c.best_params_} with a score of {grid_search_c.best_score_:.4f}"
)

# Test accuracy
accuracy_c = best_svc_c.score(test_data, test_labels)
print(f"Test accuracy with best model: {accuracy_c:.4f}")
Fitting 10 folds for each of 6622 candidates, totalling 66220 fits
The best parameters are {'C': 10.75, 'gamma': 0.04} with a score of 0.7830
Test accuracy with best model: 0.7432
Annexe : Vérification du potentiel d'avantage quantique du jeu de données pour les tâches d'apprentissage
Tous les jeux de données n'offrent pas un avantage potentiel lié à l'utilisation des PQK. Il existe certaines bornes théoriques que l'on peut utiliser comme test préliminaire pour déterminer si un jeu de données particulier peut bénéficier des PQK. Pour quantifier cela, les auteurs de Power of data in quantum machine learning [2] définissent des quantités appelées complexités de modèle classique et quantique, ainsi que la séparation géométrique entre les modèles classique et quantique. Pour espérer un avantage quantique potentiel des PQK, la séparation géométrique entre les noyaux classique et quantique projetés doit être approximativement de l'ordre de , où est le nombre d'échantillons d'entraînement. Si cette condition est satisfaite, nous passons à la vérification des complexités de modèle. Si la complexité du modèle classique est de l'ordre de tandis que la complexité du modèle quantique projeté est substantiellement inférieure à , nous pouvons espérer un avantage potentiel du PQK. La séparation géométrique est définie comme suit (F19 dans [2]) :
# Gamma values used in best models above
gamma_c = grid_search_c.best_params_["gamma"]
gamma_q = grid_search_q.best_params_["gamma"]

# Regularization parameter used in the best classical model above
C_c = grid_search_c.best_params_["C"]
l_c = 1 / C_c

# Classical and quantum kernels used above
K_c = rbf_kernel(train_data, train_data, gamma=gamma_c)
K_q = rbf_kernel(projections_train, projections_train, gamma=gamma_q)

# Intermediate matrices in the equation
K_c_sqrt = sqrtm(K_c)
K_q_sqrt = sqrtm(K_q)
K_c_inv = inv(K_c + l_c * np.eye(K_c.shape[0]))
K_multiplication = (
    K_q_sqrt @ K_c_sqrt @ K_c_inv @ K_c_inv @ K_c_sqrt @ K_q_sqrt
)

# Geometric separation
norm = np.linalg.norm(K_multiplication, ord=np.inf)
g_cq = np.sqrt(norm)
print(
    f"Geometric separation between classical and quantum kernels is {g_cq:.4f}"
)

print(np.sqrt(len(train_data)))
Geometric separation between classical and quantum kernels is 1.5440
13.114877048604
La complexité du modèle est définie comme suit (M1 dans [2]) :
# Model complexity of the classical kernel

# Number of training data
N = len(train_data)

# Predicted labels
pred_labels = best_svc_c.predict(train_data)
pred_matrix = np.outer(pred_labels, pred_labels)

# Intermediate terms
K_c_inv = inv(K_c + l_c * np.eye(K_c.shape[0]))

# First term
first_sum = np.sum((K_c_inv @ K_c_inv) * pred_matrix)
first_term = l_c * np.sqrt(first_sum / N)

# Second term
second_sum = np.sum((K_c_inv @ K_c @ K_c_inv) * pred_matrix)
second_term = np.sqrt(second_sum / N)

# Model complexity
s_c = first_term + second_term
print(f"Classical model complexity is {s_c:.4f}")
Classical model complexity is 1.3578
# Model complexity of the projected quantum kernel

# Number of training data
N = len(projections_train)

# Predicted labels
pred_labels = best_svc_q.predict(projections_train)
pred_matrix = np.outer(pred_labels, pred_labels)

# Regularization parameter used in the best classical model above
C_q = grid_search_q.best_params_["C"]
l_q = 1 / C_q

# Intermediate terms
K_q_inv = inv(K_q + l_q * np.eye(K_q.shape[0]))

# First term
first_sum = np.sum((K_q_inv @ K_q_inv) * pred_matrix)
first_term = l_q * np.sqrt(first_sum / N)

# Second term
second_sum = np.sum((K_q_inv @ K_q @ K_q_inv) * pred_matrix)
second_term = np.sqrt(second_sum / N)

# Model complexity
s_q = first_term + second_term
print(f"Quantum model complexity is {s_q:.4f}")
Quantum model complexity is 1.5806
Prochaines étapes
Si tu as trouvé ce travail intéressant, tu pourrais être intéressé par les ressources suivantes :
- Le cours d'apprentissage automatique quantique d'IBM Quantum Learning
- Le tutoriel Quantum kernel training
Références
- Utro, Filippo, et al. "Enhanced Prediction of CAR T-Cell Cytotoxicity with Quantum-Kernel Methods." arXiv preprint arXiv:2507.22710 (2025).
- Huang, Hsin-Yuan, et al. "Power of data in quantum machine learning." Nature communications 12.1 (2021): 2631.
- Daniels, Kyle G., et al. "Decoding CAR T cell phenotype using combinatorial signaling motif libraries and machine learning." Science 378.6625 (2022): 1194-1200.